FLUX 3 Action
Black Forest Labs' world action model for robotics, with a guide to generating action predictions on Jetson Thor using LeRobot.
Model Details
 View on HuggingFace
Get started with FLUX 3 Action on Jetson Thor
FLUX 3 Action is a 7B world action model from Black Forest Labs for robotics. Given camera images, the robot’s current state, and an instruction such as “pick up the cup,” it jointly predicts future visual states and robot actions. LeRobot returns the actions as an action chunk, a sequence of commands for the robot to carry out.
The model uses an image/video VAE to encode what the cameras see and a text encoder to process the instruction. A diffusion transformer combines this information with the robot state. Robot-specific input and output heads connect the transformer to that robot’s state and command format.
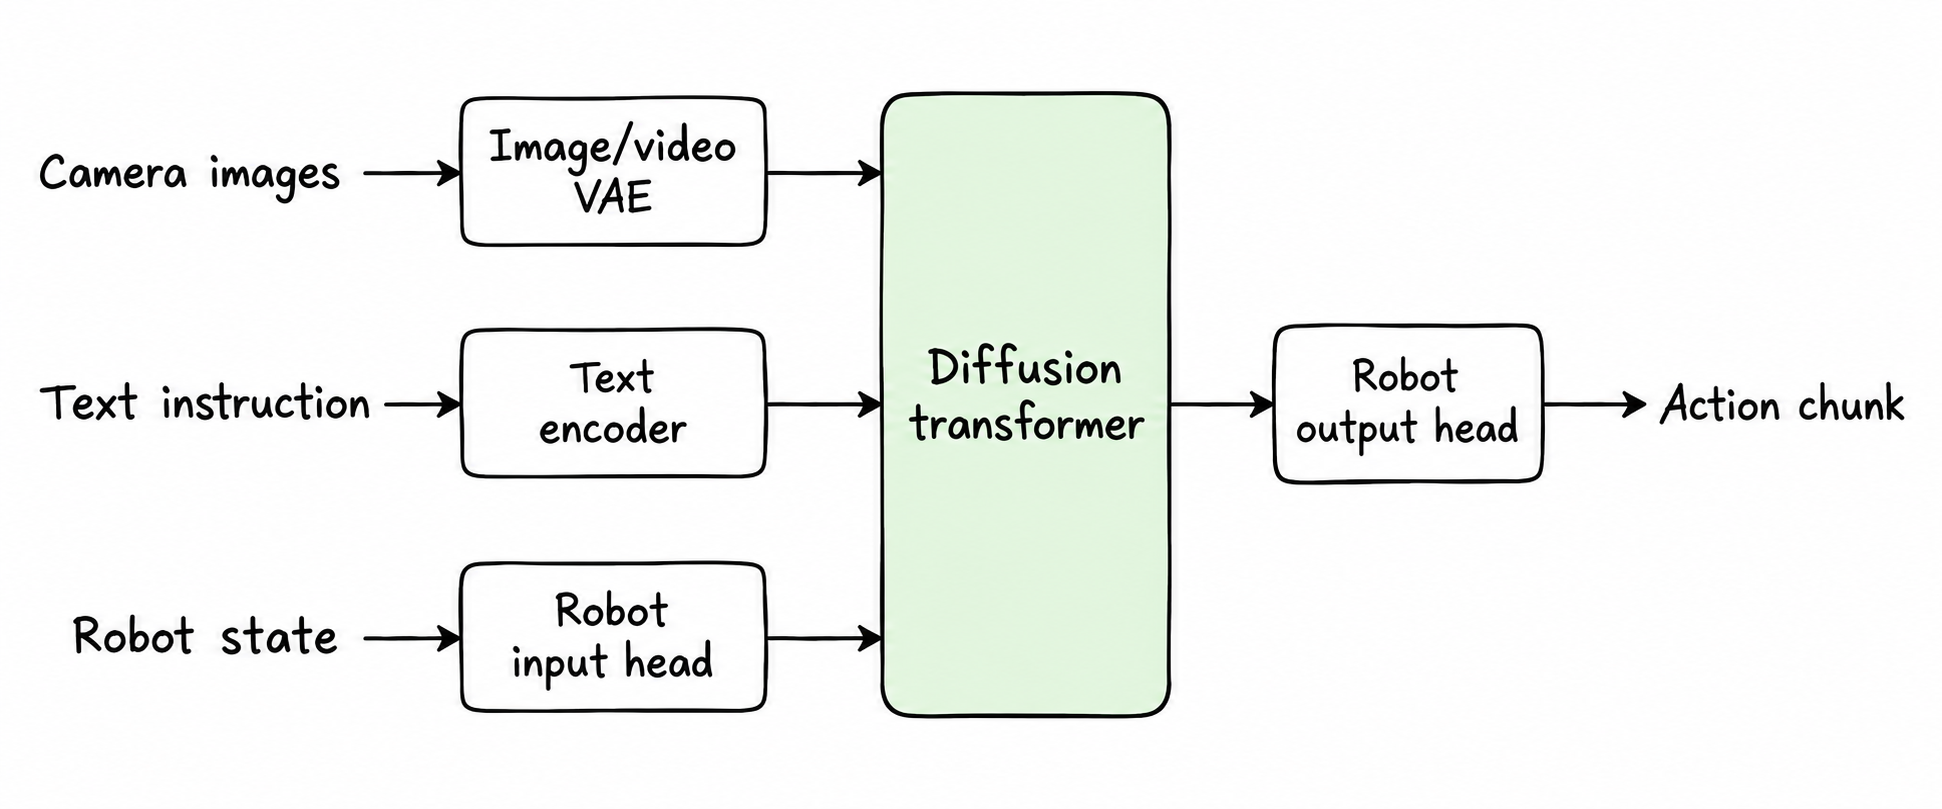
FLUX 3 Action is intended to be fine-tuned for the robot and task you want to use it for. BFL provides three starting points:
- Base: The pretrained action model. Start here when adapting to a robot that does not already have a suitable checkpoint.
- SO-101: A checkpoint already adapted to the SO-101 arm, ready for further fine-tuning on your tasks.
- DROID: A checkpoint fine-tuned on the DROID dataset for Franka Panda, providing a starting point for tasks on a compatible Franka setup.
If you use an SO-101 arm or a compatible Franka setup, start with the corresponding checkpoint and fine-tune it on demonstrations of your task using LeRobot’s LoRA-based task adaptation. Otherwise, first fully fine-tune the base for your robot, then use that checkpoint for task-specific fine-tuning. The image/video VAE and text encoder stay frozen through these stages.
This guide uses the DROID checkpoint to verify the setup and generate a prediction on the GPU, without connecting a robot. The same environment and inference workflow can be used with other complete FLUX 3 Action LeRobot checkpoints or your own fine-tunes.
1. Prerequisites
| Requirement | Configuration |
|---|---|
| Hardware | Jetson Thor |
| System software | JetPack 7.2 |
| For the container option | Docker installed and NVIDIA Container Toolkit configured for GPU access |
2. Choose your environment
Option A: Native
Assuming CUDA is installed, point these variables at your toolkit and create an isolated environment:
export CUDA_HOME=/usr/local/cuda
export PATH="$CUDA_HOME/bin:$PATH"
export LD_LIBRARY_PATH="$CUDA_HOME/lib64${LD_LIBRARY_PATH:+:$LD_LIBRARY_PATH}"

python3 -m venv .venv
source .venv/bin/activate
Option B: CUDA development container
Start from NVIDIA’s CUDA 13 devel image. It includes the CUDA toolkit, but not the model’s Python dependencies.
docker run --rm -it --gpus all \
  -v "$PWD":/workspace -w /workspace \
  nvidia/cuda:13.0.3-devel-ubuntu24.04 bash

apt-get update
apt-get install -y python3-pip python3-venv git
python3 -m venv /opt/venv
source /opt/venv/bin/activate
Run the remaining commands inside the container. Files in /workspace stay on the host; installed packages disappear when this temporary container exits.
3. Install LeRobot
Clone LeRobot’s main branch:
git clone https://github.com/huggingface/lerobot.gitInstall LeRobot and its dependencies:
# Install LeRobot and its dependencies.
pip install -e './lerobot[flux3,dataset]' \
  --extra-index-url https://download.pytorch.org/whl/cu130

# Override Torch with the versions matching our NATTEN wheel.
pip install --upgrade \
  'torch==2.13.0' 'torchvision==0.28.0' \
  --index-url https://download.pytorch.org/whl/cu130

# Install NATTEN and select its attention backend.
pip install natten==0.21.6 \
  --index-url https://pypi.jetson-ai-lab.io/sbsa/cu130

export F3_NATTEN_BACKEND=cutlass-fna
4. Download the checkpoint
Black Forest Labs provides multiple variants for the DROID embodiment. This tutorial uses the variant supporting guidance distillation:
hf download black-forest-labs/flux-3-action-droid \
    --include "variants/gd/*"
Note that the VAE and text encoder are shared with the base model and will be downloaded at runtime.
5. Generate a prediction and check GPU execution
The goal of this check is to make sure your environment is set up correctly. The snippet loads the DROID policy and its saved processors, prepares blank images and a zero robot state, and generates an action chunk. It verifies GPU execution and checks that the output contains valid numbers. It tests inference, not task accuracy, and sends nothing to a robot.
Run this Python snippet in the environment you prepared above:
import torch
from huggingface_hub import snapshot_download
from lerobot.policies.flux3 import Flux3Config, Flux3Policy
from lerobot.policies.factory import make_pre_post_processors

assert torch.cuda.is_available(), "CUDA is not available"

root = snapshot_download("black-forest-labs/flux-3-action-droid", allow_patterns=["variants/gd/*"])
ckpt = f"{root}/variants/gd"

config = Flux3Config.from_pretrained(ckpt)
config.device = "cuda"

policy = Flux3Policy.from_pretrained(ckpt, config=config).to("cuda").eval()
pre, post = make_pre_post_processors(config, pretrained_path=ckpt)

observation = {
    "task": "Pick up the object",
    "observation.state": torch.zeros(config.input_features["observation.state"].shape),
}
for key in config.camera_order:
    observation[key] = torch.zeros(config.input_features[key].shape)

with torch.inference_mode():
    prediction = policy.predict_action_chunk(pre(observation))
    assert prediction.is_cuda, "Prediction was not returned on GPU"
    actions = post(prediction)
    assert torch.isfinite(actions).all(), "Invalid action values"

print("GPU:", torch.cuda.get_device_name())
print("Prediction device:", prediction.device)
print("Action shape:", tuple(actions.shape))
If your run is successful, you should expect to see this result:
GPU: NVIDIA Thor
Prediction device: cuda:0
Action shape: (1, 32, 8)
This confirms that the example completed inference with a CUDA prediction. The actions tensor contains 32 commands, each with seven arm joint positions and one gripper value. The code prints the device and tensor shape, not all the command values.
For another checkpoint, change the checkpoint path and supply its expected camera views, robot state, and any required history. The dummy observations above are for the DROID example.
6. Continue with LeRobot
Keep using this environment, adding any training packages or robot drivers specified in the guides below. Your starting point depends on your robot:
- If you use an SO-101 arm or a compatible Franka setup, start from BFL’s SO-101 or DROID checkpoint and follow LeRobot’s task-adaptation guide with demonstrations of your task. This uses LoRA adapters on the transformer while training the robot’s input and output heads in full.
- If neither checkpoint matches your robot, follow BFL’s full fine-tuning workflow to adapt the base to your robot first. Then export a complete LeRobot checkpoint and use it for task-specific fine-tuning.
Once you have your trained checkpoint, follow LeRobot’s rollout guide and camera configuration guide to connect your hardware, map observations, and run it.
Keep the trained checkpoint’s configuration and processors with its weights. A saved LoRA adapter also needs its referenced base checkpoint. Unlike the offline example, lerobot-rollout sends commands through your configured robot driver and can move the robot.