Multi-Modal AI Studio on Jetson
Run a conversational AI pipeline on Jetson Thor with on-device ASR, LLM/VLM, and TTS.
 Chitoku YATO
  Aditya Sahu
 Multi-Modal AI Studio is a conversational AI interface for building and tuning voice AI systems. It supports NVIDIA Riva, OpenAI, and other backends; records sessions with full config snapshots; and provides a real-time timeline and latency analysis (TTFA, turn-taking) to compare and optimize setups.
This tutorial demonstrates one configuration with the NVIDIA RIVA SDK for ASR/TTS and Cosmos-Reason2 on vLLM for reasoning. The application is modular, so you can plug in other compatible ASR, LLM/VLM, or TTS backends that expose the supported APIs.
Prerequisites
This tutorial is written for Jetson AGX Thor because it uses the RIVA SDK and Cosmos-Reason2-8B together on the same device. You can adapt the same application to other model backends if your Jetson has less memory.
| Requirement | Details |
|---|---|
| Jetson device | Jetson AGX Thor running JetPack 7 |
| ASR service | NVIDIA RIVA ARM64 quick start initialized with the Parakeet ASR model |
| LLM / VLM service | Cosmos-Reason2-8B weights available at ~/models/cosmos-reason2-8b and served by vLLM |
| TTS service | NVIDIA RIVA ARM64 quick start initialized with the Magpie TTS model |
| Client browser | A PC browser on the same network, or a browser on Jetson Thor, with microphone and camera access |
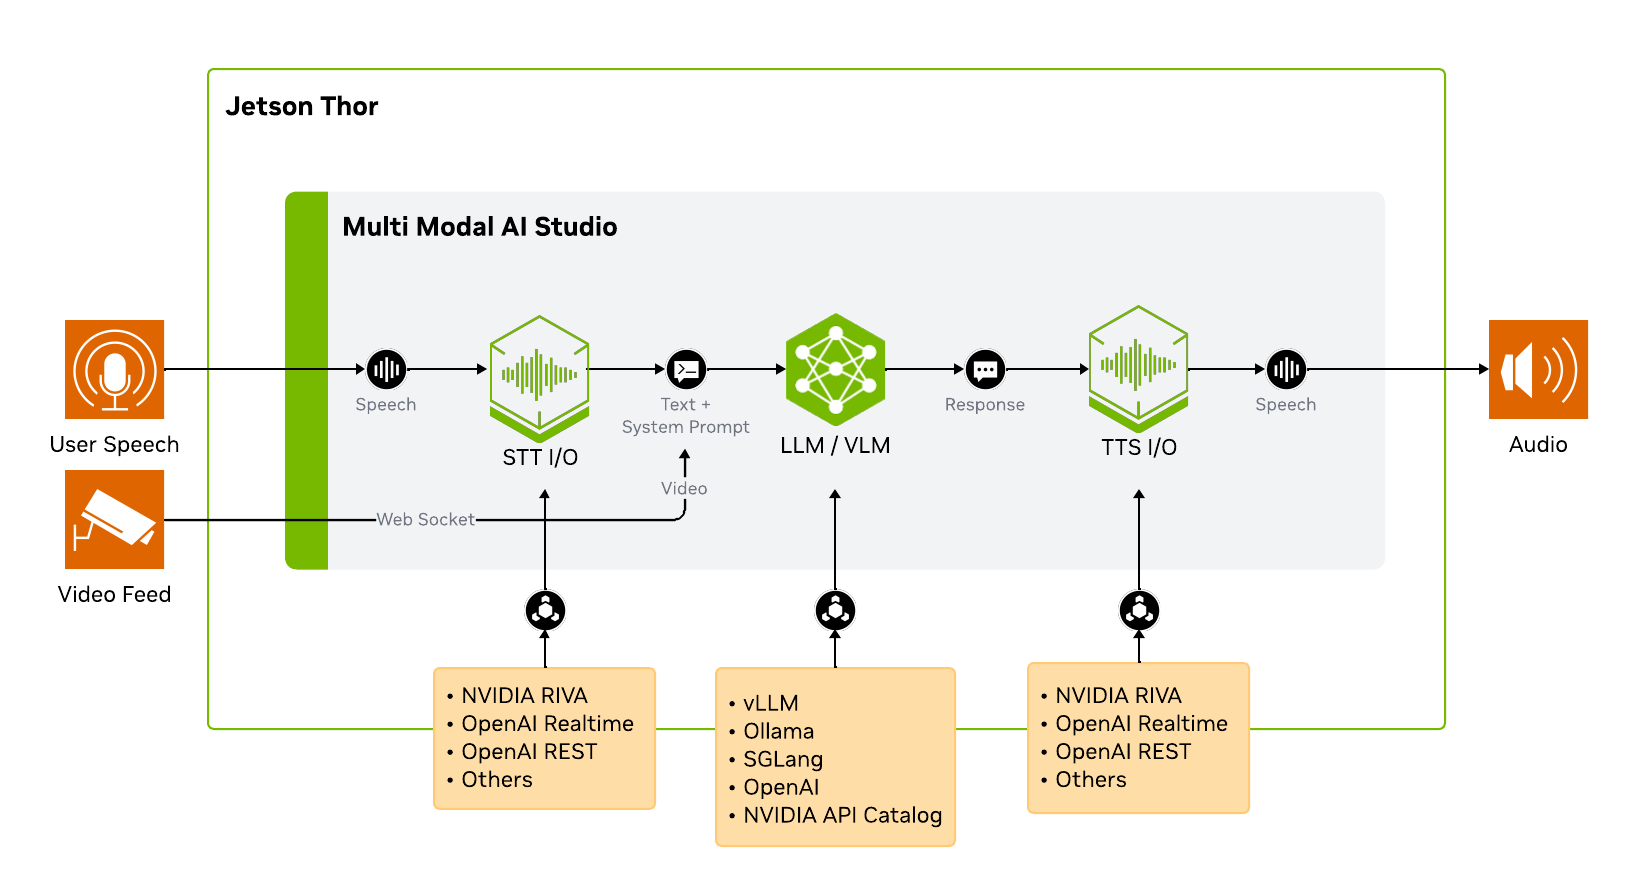
Architecture
Multi-Modal AI Studio does not run the AI models by itself. It connects to model services through standard APIs, which makes the pipeline easy to swap and tune.
Step 1: Start NVIDIA RIVA SDK (ASR + TTS)
RIVA provides the ASR and TTS services for the voice pipeline. This tutorial uses Riva 2.24.0 Embedded (aarch64); see the Riva support matrix for platform and model compatibility.
Before running the commands below, install and initialize RIVA by following the NVIDIA Riva setup for voice ASR/TTS instructions in the Multi-Modal AI Studio repository.
After RIVA is installed and initialized, start it from the RIVA quick start directory:
cd riva_quickstart_arm64_v2.24.0
bash riva_start.sh
Wait for the server to be ready. You can monitor the logs:
docker logs -f riva-speechLook for:
RIVA server listening on 0.0.0.0:50051
All models loaded successfully
This can take several minutes, especially the first time after boot.
Step 2: Start vLLM with Cosmos-Reason2
Next, start the LLM/VLM backend. RIVA uses ports 8000, 8001, and 8002, so this tutorial serves vLLM on port 8010.
Use the Cosmos Reason2 8B model page for the latest serving commands, including NGC CLI setup if you have not configured it yet. The vLLM path uses the FP8 checkpoint from NGC, so download the model first and set MODEL_PATH:
ngc registry model download-version "nim/nvidia/cosmos-reason2-8b:1208-fp8-static-kv8" \
  --dest ~/.cache/huggingface/hub

export MODEL_PATH="${HOME}/.cache/huggingface/hub/cosmos-reason2-8b_v1208-fp8-static-kv8"
Then serve the model on port 8010:
mkdir -p ~/.cache/vllm
sudo sysctl -w vm.drop_caches=3

sudo docker run -it --rm --runtime=nvidia --network host \
  -v $MODEL_PATH:/models/cosmos-reason2-8b:ro \
  -v ${HOME}/.cache/vllm:/root/.cache/vllm \
  ghcr.io/nvidia-ai-iot/vllm:0.14.0-r38.3-arm64-sbsa-cu130-24.04 \
  vllm serve /models/cosmos-reason2-8b \
    --served-model-name nvidia/cosmos-reason2-8b-fp8 \
    --max-model-len 8192 \
    --gpu-memory-utilization 0.7 \
    --reasoning-parser qwen3 \
    --media-io-kwargs '{"video": {"num_frames": -1}}' \
    --enable-prefix-caching \
    --port 8010
Wait until the server is ready:
INFO: Uvicorn running on http://0.0.0.0:8010Verify the OpenAI-compatible API:
curl http://localhost:8010/v1/modelsYou should see nvidia/cosmos-reason2-8b-fp8 in the response.
⚠️ Port conflict with RIVA
Do not use vLLM’s default port when RIVA is running. Keep vLLM on 8010 or another unused port, then use the same port in Multi-Modal AI Studio’s LLM API base URL.
Step 3: Start Multi-Modal AI Studio
In a new terminal, keep RIVA and vLLM running, then clone and install the application:
git clone https://github.com/NVIDIA-AI-IOT/multi_modal_ai_studio.git ~/multi_modal_ai_studio
cd ~/multi_modal_ai_studio

python3 -m venv .venv
source .venv/bin/activate

pip install -e .
Launch the Studio server and point it at the local RIVA and vLLM services:
multi-modal-ai-studio --port 8092 \
  --asr-server localhost:50051 \
  --tts-server localhost:50051 \
  --llm-api-base http://localhost:8010/v1 \
  --llm-model nvidia/cosmos-reason2-8b-fp8
Step 4: Open the Web Interface
From your client PC browser, open:
https://<JETSON_IP>:8092Accept the self-signed certificate by clicking Advanced and continuing to the site. HTTPS is required because browsers restrict microphone and camera access on insecure origins.
When prompted, allow microphone and camera permissions.
Step 5: Configure and Run a Voice + Vision Session
Click New Voice Chat to open the configuration panel. First configure the tabs below, then click Start Session and speak naturally.

1. ASR Tab → Select “RIVA Speech”
| Setting | Value |
|---|---|
| Server Address | localhost:50051 |
| ASR Language | en-US |
| ASR Model | parakeet-1.1b-en-US-asr-streaming-silero-vad-sortformer |
The Silero VAD variant detects when you start and stop speaking, so the system knows when to begin transcription and when your turn is over.
2. LLM/VLM Tab
| Setting | Value |
|---|---|
| API Base URL | http://localhost:8010/v1 |
| Model | nvidia/cosmos-reason2-8b-fp8 |
| Utility Model | nvidia/cosmos-reason2-8b-fp8 |
| Enable Streaming Responses | Checked |
| Include Conversation History | Checked |
| Enable Vision (VLM) | Video Input |
| System Prompt | See below |
Suggested system prompt for concise vision responses:
You are a vision assistant. Give one short sentence answers only. Be direct. No explanations. Use plain text only.📝 Why these settings?
- Streaming Responses lets TTS start speaking before the full LLM response is generated, reducing perceived latency.
- Conversation History gives the LLM context from previous turns, enabling follow-up questions.
- Vision (Video Input) captures frames from the camera and includes them in the LLM prompt.
- System Prompt shapes the AI’s behavior. Shorter responses mean faster TTS and a more conversational feel.
3. TTS Tab
| Setting | Value |
|---|---|
| RIVA Server | localhost:50051 |
| TTS Model | magpie_tts_ensemble_Magpie-Multilingual |
| Language | English (US) |
| Sample Rate (Hz) | 22050 |
| Quality | High (Better) |
| Start speaking before LLM finishes | Checked |
| Words before first speech | 10 |
“Start speaking before LLM finishes” is key for low latency. TTS begins synthesizing after the first 10 words arrive from the LLM, rather than waiting for the complete response.
4. Devices Tab
| Setting | Value |
|---|---|
| Camera Device | Default (browser) |
| Microphone Device | Default (browser) |
| Speaker Device | Default (browser) |
These devices are selected from the client browser. If you open the UI on a laptop, the laptop microphone, camera, and speakers are used even though the AI services run on Jetson.
5. App Tab
| Setting | Value |
|---|---|
| Start sessions with microphone muted | Unchecked |
| Barge-in | Unchecked |
| Session Directory | Default (sessions) |
Once the basic session is working, enable barge-in to test interruption behavior.
After the session starts, watch the timeline at the bottom of the interface. It shows when each stage starts and finishes:
- ASR transcribes your speech.
- LLM/VLM generates the assistant response.
- TTS synthesizes and plays audio.
Try prompts that require both speech and vision:
What object am I holding?Describe what changed in the scene.Is there a person visible? Answer yes or no.When you are finished, click the red stop button. Select the session from the history sidebar to review the transcript, timeline, and latency metrics.
Tuning for Lower Latency
The best settings depend on your model, microphone, room noise, and use case. These are good first levers:
| Lever | Why It Helps |
|---|---|
| Short system prompt | Reduces prompt tokens and encourages concise responses |
| Streaming responses | Allows TTS to start before the full response is complete |
| Words before first speech | Lower values start speech earlier, but can sound less natural |
| VAD sensitivity | Improves turn detection in noisy rooms |
| Max model length | Reduces KV cache memory pressure |
| GPU memory utilization | Leaves headroom for RIVA and the app |
Start with the prompt
For conversational demos, short spoken responses usually feel better than detailed paragraphs. Tune the system prompt first before changing infrastructure settings.
Troubleshooting
multi-modal-ai-studio: command not found
Activate the Python virtual environment before launching:
cd ~/multi_modal_ai_studio
source .venv/bin/activate
multi-modal-ai-studio --help
Port 8092 is already in use
Stop the existing process and restart:
fuser -k 8092/tcpvLLM fails to start because ports are busy
Do not use vLLM’s default port when RIVA is running. Use --port 8010 or another unused port, then update the Studio LLM API base URL to match.
Browser cannot access the microphone or camera
Make sure you opened the HTTPS URL:
https://<JETSON_IP>:8092Accept the self-signed certificate and allow browser permissions for microphone and camera.
ASR does not resume after being muted for a long time
The ASR stream can time out if it stops receiving audio for an extended period. Stop the session with the red button, then start a fresh session.
GPU memory is not released after stopping vLLM
After stopping the vLLM container, clear cached memory:
sudo sysctl -w vm.drop_caches=3Next Steps
- Change the system prompt to create a different assistant personality.
- Enable barge-in and test interrupting the assistant while it is speaking.
- Try a USB camera connected directly to Jetson.
- Compare latency with vision enabled and disabled.
- Save your favorite configuration as a preset.
- Swap the vLLM model or RIVA voices to evaluate different pipeline combinations.