OpenPi π₀.₅ on Jetson Thor
Deploy Physical Intelligence's OpenPi π₀.₅ Vision-Language-Action (VLA) model on NVIDIA Jetson AGX Thor with TensorRT NVFP4 quantization for low-latency end-to-end inference.
 Aditya Sahu
  Anqi Liu
 Deploy Physical Intelligence’s OpenPi π₀.₅ Vision-Language-Action (VLA) model on NVIDIA Jetson AGX Thor with TensorRT NVFP4 quantization for low-latency end-to-end inference.
What is OpenPi π₀.₅?
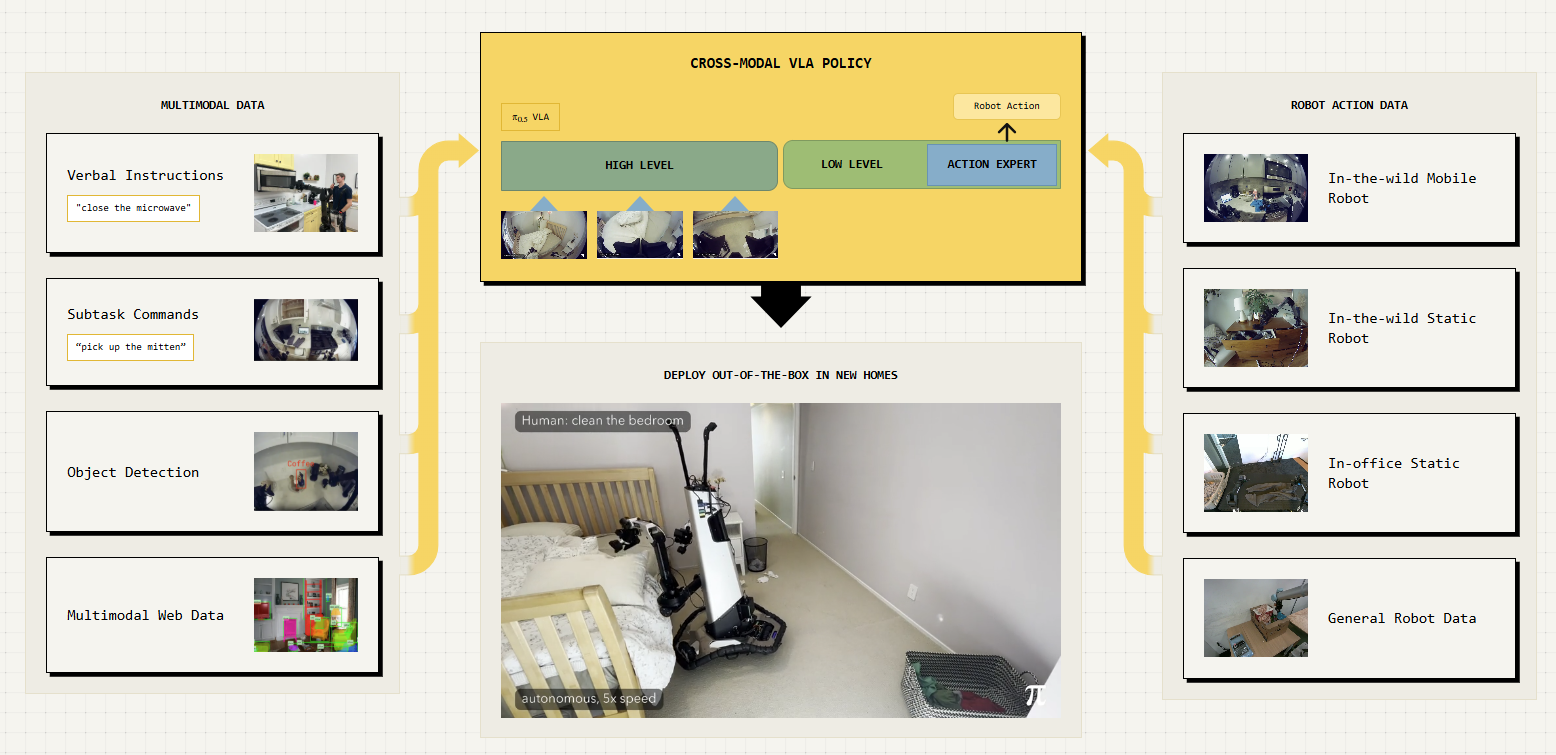
OpenPi is Physical Intelligence’s open-source robotics model repository. The π₀.₅ model is a flow-matching Vision-Language-Action (VLA) model pre-trained on 10,000+ hours of robot data. It takes camera images and a natural-language instruction as input and outputs robot actions — enabling language-conditioned robotic manipulation.
Why Jetson AGX Thor?
VLA models are computationally demanding, they fuse vision encoders, language models and action decoders into a single pipeline that must run at real-time control rates. Jetson AGX Thor brings Blackwell-class GPU compute with up to 128GB of unified memory, giving it the headroom to run these large multimodal models entirely on-device. Combined with TensorRT acceleration and FP8/NVFP4 precision support, Thor can deliver the throughput needed for closed-loop robotic control without relying on a separate GPU server.
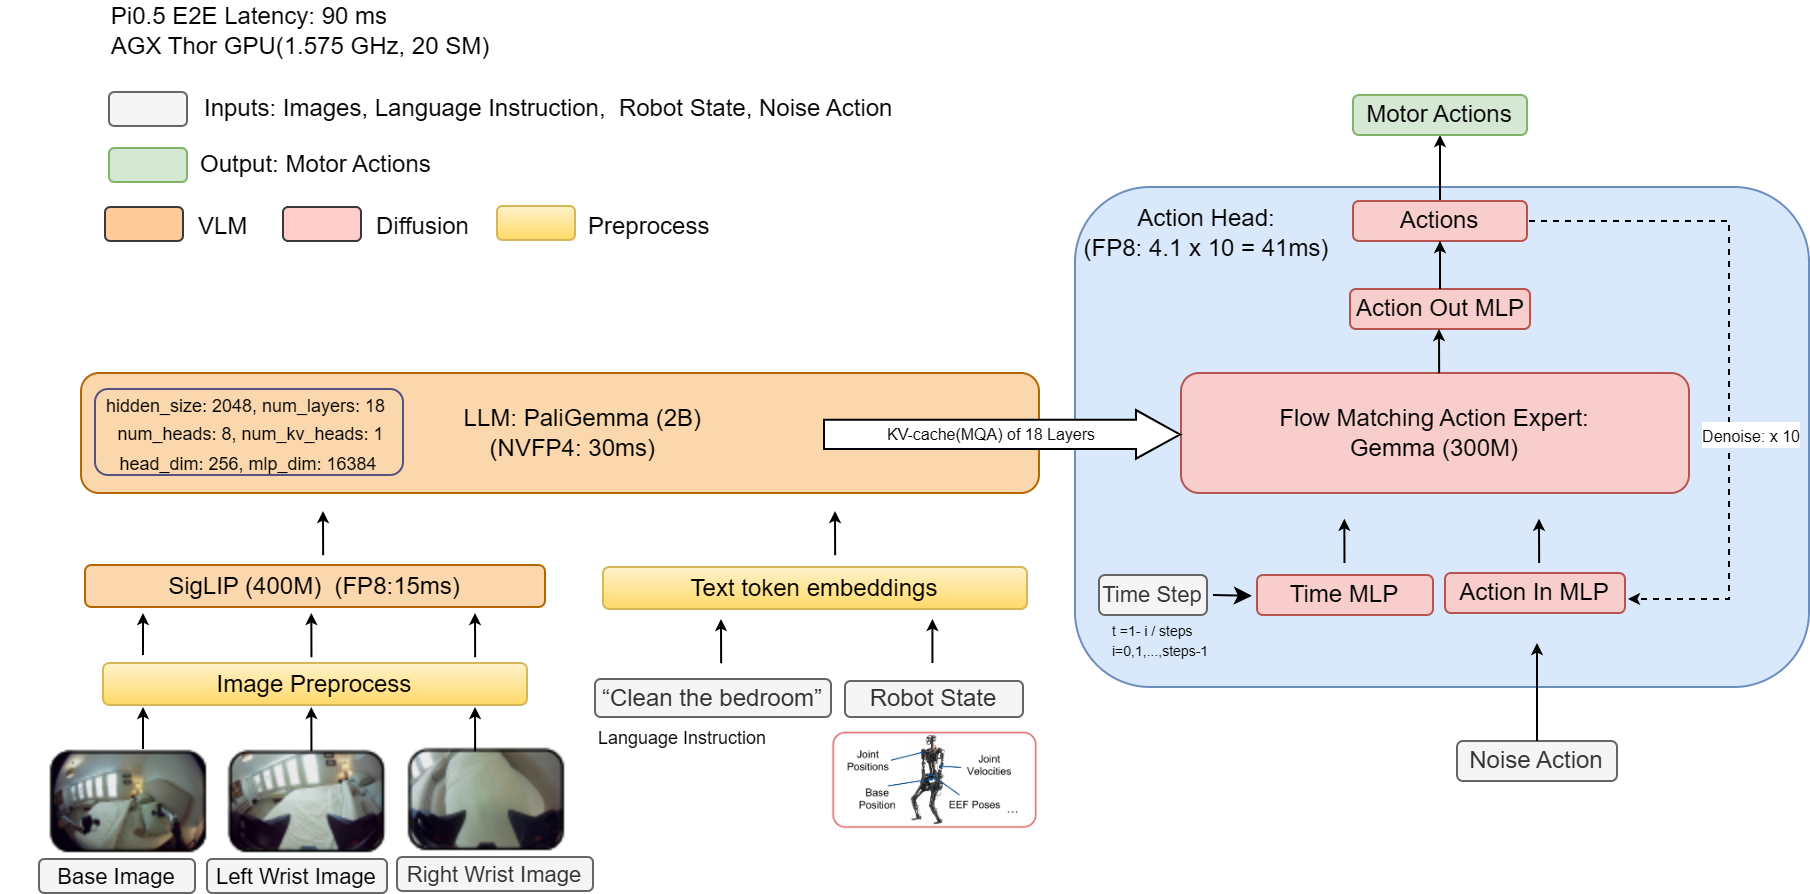
Pipeline Overview
JAX Checkpoint ──► PyTorch ──► ONNX (FP8 + NVFP4) ──► TensorRT Engine ──► Inference| Stage | What happens |
|---|---|
| 1. JAX → PyTorch | Convert original JAX/Flax weights to PyTorch SafeTensors |
| 2. PyTorch → ONNX | Export with FP8/NVFP4 quantization via NVIDIA ModelOpt |
| 3. ONNX → TensorRT | Compile optimized engine with trtexec |
| 4. Inference | Run the TensorRT engine for low-latency inference |
Performance
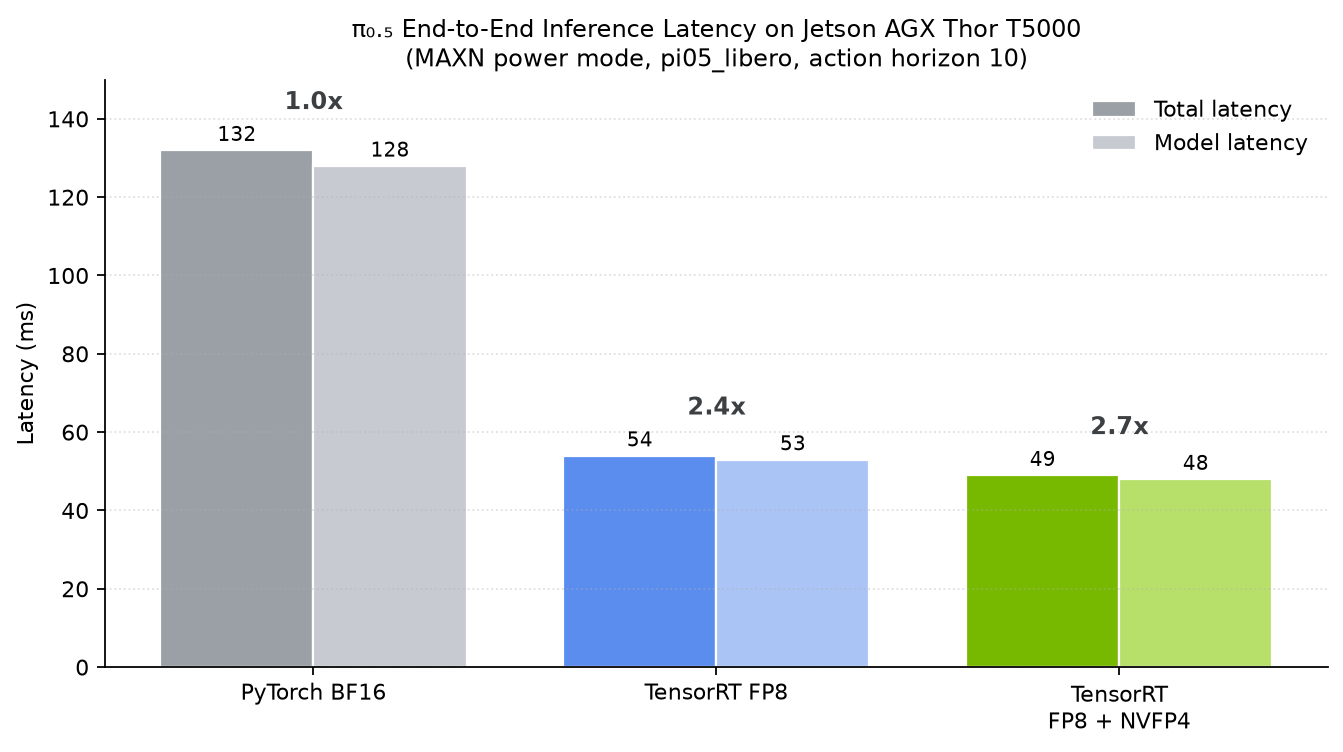
Benchmarked on Jetson AGX Thor Developer Kit (JetPack 7.2, MAXN power mode), pi05_libero, action horizon 10:
| Inference Backend | Total Latency (ms) | Model Latency (ms) | Speedup |
|---|---|---|---|
| PyTorch BF16 | ~132 | ~128 | 1.0x |
| TensorRT FP8 | ~54 | ~53 | 2.4x |
| TensorRT FP8 + NVFP4 | ~49 | ~48 | ~2.7x |
Prerequisites
Hardware
- NVIDIA Jetson AGX Thor Developer Kit
- NVMe SSD recommended (model weights are ~6 GB+)
Software
| Component | Required Version |
|---|---|
| JetPack | 7.2 (L4T R39.x) |
| CUDA | 13.0+ |
| Docker | 28.x+ |
| NVIDIA Container Toolkit | 1.18+ |
Check your setup:
cat /etc/nv_tegra_release   # Should show R39
nvidia-smi                   # Should show CUDA 13.0 or above, Thor GPU
docker --version             # Docker 28.x or newer
dpkg-query -W nvidia-container-toolkit
Step 1: Set Jetson to Maximum Performance
Boost all clocks and disable GPU power gating for consistent benchmark results.
# Set maximum performance power mode
sudo nvpmodel -m 0

# Lock all clocks to maximum frequency
sudo jetson_clocks
Verify with:
sudo jetson_clocks --showJetPack 7.0 GA only: if you see the GPU railgating (clocks dropping when idle), disable it explicitly. This is not needed on JP 7.1 / 7.2:
sudo sh -c 'echo on > /sys/bus/pci/devices/0000:01:00.0/power/control'
Step 2: Clone the Repository and Add the Deployment Scripts
2.1 Clone OpenPi (pinned to a validated commit)
Clone the upstream OpenPi repository (with submodules) and check out the exact commit this tutorial was validated against. Pinning to a fixed commit means future upstream changes cannot silently break the steps below.
git clone --recurse-submodules https://github.com/Physical-Intelligence/openpi.git
cd openpi
git checkout 15a9616a00943ada6c20a0f158e3adb39df2ccac
Note: Pinned to commit
15a9616(update output objects to support batching, 2026-06-16). The full FP8 + NVFP4 pipeline in this tutorial has been validated end-to-end on this commit.
2.2 Add the Jetson Thor Deployment Scripts
Upstream OpenPi does not include the Jetson Thor deployment scripts or the TensorRT export patches. From the root of the checkout (openpi/), run the helper script to add them:
wget -qO- https://www.jetson-ai-lab.com/code-samples/openpi_on_thor/download.sh | bashThis fetches the deployment_scripts/ folder (thor.Dockerfile, pyproject.toml, pi05_inference.py, pytorch_to_onnx.py, build_engine.sh, trt_model_forward.py, trt_torch.py, calibration_data.py) and applies four small patches on top of the pinned upstream commit:
examples/convert_jax_model_to_pytorch.pyscripts/serve_policy.pysrc/openpi/models/model.pysrc/openpi/models_pytorch/transformers_replace/models/gemma/modeling_gemma.py
Step 3: Build the Docker Image for Jetson Thor
The Dockerfile at deployment_scripts/thor.Dockerfile uses the NVIDIA PyTorch container as the base and installs all dependencies from the Jetson AI Lab pip index.
sudo docker build -t openpi-pi0.5:l4t-jp7.2 -f deployment_scripts/thor.Dockerfile .Note: The first build takes 15–20 minutes. Subsequent builds use Docker cache and are much faster.
What the Dockerfile does (click to expand)
- Base image:
nvcr.io/nvidia/pytorch:26.05-py3(PyTorch + CUDA + TensorRT + ModelOpt pre-installed) - Pip index:
https://pypi.jetson-ai-lab.io/sbsa/cu130(precompiled aarch64 wheels) - Installs (in order):
PyYAML==6.0.2with--no-deps— pinned up front so dependency resolution can’t pull a conflicting version- OpenPi in editable mode with the
[thor]extras — Thor-specific wheels includingtorchcodec,onnxruntime,onnx_graphsurgeon,onnxscript,onnx-ir,ml-dtypes,diffusers,decord2,nvtx(on top of core deps such asonnx,transformers,jax,lerobot,chex) onnxslimandlief
- System packages: ffmpeg, OpenCV dependencies, build tools
Step 4: Launch the Docker Container
sudo docker run --rm -it --runtime nvidia \
  -v "$PWD":/workspace \
  -v "$HOME/.cache/openpi":/root/.cache/openpi \
  -v "$HOME/.cache/huggingface":/root/.cache/huggingface \
  -w /workspace \
  -p 8000:8000 \
  openpi-pi0.5:l4t-jp7.2
Tip: The
-v "$HOME/.cache/openpi":/root/.cache/openpimount persists downloaded checkpoints, converted models, and TensorRT engines across container restarts. Without it, you’d need to re-download and re-convert everything each time. The~/.cache/huggingfacemount reuses yourhf auth logintoken so the FP8 calibration dataset (Step 9) can download without re-authenticating.
You are now inside the container. All remaining steps run inside this shell.
Step 5: Configure the Environment (Inside Container)
5.1 Set PYTHONPATH
export PYTHONPATH=packages/openpi-client/src:src:.:$PYTHONPATH5.2 Choose a Model Config
Pick the config name for your target robot/task. We’ll use pi05_libero as the running example.
export CONFIG_NAME=pi05_liberoAvailable configs:
| Config Name | Robot Platform | Description |
|---|---|---|
pi05_libero | LIBERO (sim) | Fine-tuned for LIBERO benchmark tasks |
pi05_droid | DROID (Franka) | Fine-tuned on DROID dataset, good generalization |
pi05_aloha | ALOHA | For bimanual ALOHA platforms |
5.3 Apply Transformers Library Patches
OpenPi requires patched versions of several HuggingFace Transformers files (for AdaRMS normalization, precision control, and KV cache behavior).
cp -r ./src/openpi/models_pytorch/transformers_replace/* \
  /usr/local/lib/python3.12/dist-packages/transformers/
These files already include the ONNX/TensorRT compatibility fixes needed for NVFP4 export (the GemmaRMSNorm.extra_repr() guard and the explicit attention reshape dimension), so no additional patching step is required.
Step 6: Download the JAX Checkpoint
The model checkpoints are stored on Google Cloud Storage and are downloaded automatically. The download includes both the model parameters and normalization assets.
python -c "
import os
from openpi.shared import download
config_name = os.getenv('CONFIG_NAME')
checkpoint_dir = download.maybe_download(f'gs://openpi-assets/checkpoints/{config_name}')
print(f'Checkpoint downloaded to: {checkpoint_dir}')
"
The checkpoint will be cached at ~/.cache/openpi/openpi-assets/checkpoints/${CONFIG_NAME}/.
Step 7: Convert JAX Checkpoint to PyTorch
Convert the original JAX/Flax checkpoint to PyTorch SafeTensors format:
python examples/convert_jax_model_to_pytorch.py \
  --config-name ${CONFIG_NAME} \
  --checkpoint-dir ~/.cache/openpi/openpi-assets/checkpoints/${CONFIG_NAME} \
  --output-path ~/.cache/openpi/openpi-assets/checkpoints/${CONFIG_NAME}_pytorch
Important:
--output-pathmust be a directory path, not a file path. The script createsmodel.safetensorsandconfig.jsoninside it automatically.
This takes ~5–10 minutes. When complete, you’ll see:
Model conversion completed successfully!
Model saved to /root/.cache/openpi/openpi-assets/checkpoints/pi05_libero_pytorch
The conversion script also copies the normalization assets/ into the output directory automatically, so no manual copy is needed. The output directory contains:
model.safetensors— PyTorch weightsconfig.json— model architecture metadataassets/— normalization stats (needed for inference)
Step 8: (Optional) Verify PyTorch Inference
Before quantizing, confirm the PyTorch model works correctly:
python deployment_scripts/pi05_inference.py \
  --config-name ${CONFIG_NAME} \
  --checkpoint-dir ~/.cache/openpi/openpi-assets/checkpoints/${CONFIG_NAME}_pytorch \
  --inference-mode pytorch \
  --num-warmup 3 \
  --num-test-runs 5
Expected output (~132 ms per inference on Thor, MAXN mode, torch.compile BF16):
============================================================
Results:
============================================================
Actions shape: (10, 7)
Actions range: [-0.4481, 1.0103]
Total inference time: 132.00 ± 0.89 ms
    (min: 131.46, max: 133.77)
Model inference time: 128.34 ± 0.60 ms
    (min: 127.95, max: 129.53)
Step 9: Export to ONNX with NVFP4 Quantization
This step converts the PyTorch model to ONNX format with FP8 + NVFP4 quantization using NVIDIA ModelOpt:
python deployment_scripts/pytorch_to_onnx.py \
  --checkpoint_dir ~/.cache/openpi/openpi-assets/checkpoints/${CONFIG_NAME}_pytorch \
  --output_path ~/.cache/openpi/openpi-assets/checkpoints/${CONFIG_NAME}_pytorch \
  --config_name ${CONFIG_NAME} \
  --precision fp8 \
  --enable_llm_nvfp4 \
  --quantize_attention_matmul
What happens:
- Model is loaded and patched for TensorRT-compatible export
- Calibration data is loaded (from the dataset) for FP8 quantization
- Attention matmul operations get QDQ nodes inserted
- LLM layers are quantized to NVFP4 precision and converted to 2DQ format
- ONNX model is exported with
dynamo=False(legacy TorchScript tracer), dynamic axes, and external data
The ONNX model is saved to:
~/.cache/openpi/openpi-assets/checkpoints/${CONFIG_NAME}_pytorch/onnx/model_fp8_nvfp4.onnxOther precision options (click to expand)
| Flag | Precision | Model Latency | Notes |
|---|---|---|---|
--precision fp8 --quantize_attention_matmul | FP8 | ~53 ms | Most stable accuracy (cosine ≈ 0.9995) |
--precision fp8 --enable_llm_nvfp4 --quantize_attention_matmul | FP8 + NVFP4 | ~48 ms | Fastest; accuracy typically ≈ 0.99, see Step 12 |
Note: Pure FP16 (
--precision fp16) is not supported. The Pi0.5 model uses BF16 natively (8-bit exponent). FP16 has a much smaller dynamic range (5-bit exponent), causing overflow in the Gemma attention layers that compounds over the denoising loop.
Step 10: Build TensorRT Engine
Compile the ONNX model into a TensorRT engine using trtexec:
ACTION_HORIZON=10 bash deployment_scripts/build_engine.sh \
  ~/.cache/openpi/openpi-assets/checkpoints/${CONFIG_NAME}_pytorch/onnx/model_fp8_nvfp4.onnx \
  ~/.cache/openpi/openpi-assets/checkpoints/${CONFIG_NAME}_pytorch/engine/model_fp8_nvfp4.engine
Note:
ACTION_HORIZON=10matches the default forpi05_libero. Adjust if using a different config (checkconfig.model.action_horizon).
Language length: the engine is built with a fixed language sequence length of 208 tokens (a multiple of 16 for better TensorRT performance). At runtime the inference script automatically pads shorter prompts and truncates longer ones to this length, so no action is needed unless your prompts routinely exceed ~208 tokens.
This step takes 10–30 minutes on Thor as trtexec optimizes the graph, selects kernels, and compiles CUDA code (it also captures a CUDA graph via --useCudaGraph). The build log is saved alongside the engine file.
When complete:
TensorRT engine built successfully!
  Engine: ~/.cache/.../engine/model_fp8_nvfp4.engine
Step 11: Run TensorRT NVFP4 Inference
Run the optimized TensorRT engine:
python deployment_scripts/pi05_inference.py \
  --config-name ${CONFIG_NAME} \
  --checkpoint-dir ~/.cache/openpi/openpi-assets/checkpoints/${CONFIG_NAME}_pytorch \
  --engine-path ~/.cache/openpi/openpi-assets/checkpoints/${CONFIG_NAME}_pytorch/engine/model_fp8_nvfp4.engine \
  --inference-mode tensorrt \
  --num-warmup 3 \
  --num-test-runs 10
On startup you should see the runtime hooks activate:
  [trt hooks] tokenize cache installed (OPENPI_TOKENIZE_CACHE=0 to disable)
  [trt hooks] fast infer installed: Observation validation bypassed (OPENPI_FAST_INFER=0 to disable)
[trt_torch] CUDA graph captured (1 shape signature(s))
Expected output (~49 ms on Thor, MAXN mode, FP8 + NVFP4):
============================================================
Results:
============================================================
Actions shape: (10, 7)
Actions range: [-1.0322, 0.9781]
Total inference time: 48.84 ± 0.16 ms
    (min: 48.70, max: 49.48)
Model inference time: 48.08 ± 0.11 ms
    (min: 47.99, max: 48.53)
Runtime knobs (all enabled by default, set to
0to disable):OPENPI_FAST_INFER(skip observation validation),OPENPI_TOKENIZE_CACHE(cache tokenizer results),OPENPI_MASK_DTYPE_FIX(attention-mask dtype fix for the PyTorchtorch.compilepath), andTRT_TORCH_CUDA_GRAPH(CUDA-graph replay of the engine enqueue).
Step 12: (Optional) Compare PyTorch vs TensorRT
Compare accuracy and speedup against PyTorch (click to expand)
The inference script has a built-in comparison mode that runs both backends with identical inputs and reports accuracy differences:
python deployment_scripts/pi05_inference.py \
  --config-name ${CONFIG_NAME} \
  --checkpoint-dir ~/.cache/openpi/openpi-assets/checkpoints/${CONFIG_NAME}_pytorch \
  --engine-path ~/.cache/openpi/openpi-assets/checkpoints/${CONFIG_NAME}_pytorch/engine/model_fp8_nvfp4.engine \
  --inference-mode compare
Expected comparison output (FP8 + NVFP4):
Cosine Similarity:
  - Overall: 0.99456406
  - Per-timestep Mean: 0.99467865
  - Per-timestep Min:  0.98825477
  - Per-timestep Max:  0.99778910

Speedup:
  - Total: 2.69x
  - Model: 2.66x
Key metrics:
- Cosine similarity ≈ 0.99 confirms the TRT engine faithfully reproduces PyTorch behavior
- ~2.7× speedup over PyTorch BF16 inference
Note:
comparemode draws a fresh random noise each run (fed identically to both backends), so the cosine value varies slightly from run to run. For a reproducible number, pin the noise with--golden-noise-path=golden_noise.npy.
Step 13: (Optional) Launch Inference Server
For production robotics deployment, launch a WebSocket policy server that robots can query over the network:
python scripts/serve_policy.py \
  --use-tensorrt \
  --tensorrt-engine ~/.cache/openpi/openpi-assets/checkpoints/${CONFIG_NAME}_pytorch/engine/model_fp8_nvfp4.engine \
  --port 8000 \
  policy:checkpoint \
  --policy.config=${CONFIG_NAME} \
  --policy.dir=~/.cache/openpi/openpi-assets/checkpoints/${CONFIG_NAME}_pytorch
Note: This uses OpenPi’s
scripts/serve_policy.py, extended in this fork with TensorRT support (--use-tensorrt/--tensorrt-engine, backed bydeployment_scripts/trt_model_forward.py). To serve without TensorRT (PyTorch only), omit--use-tensorrtand--tensorrt-engine.
The server listens on 0.0.0.0:8000 and accepts observations via WebSocket. A robot client can then query it:
from openpi_client import websocket_client_policy

# Connect to the inference server running on Thor
policy = websocket_client_policy.WebsocketClientPolicy(
    host="<THOR_IP_ADDRESS>",
    port=8000,
)

# Send an observation and get actions back
action_chunk = policy.infer({
    "observation/image": camera_image,            # (224, 224, 3) uint8
    "observation/wrist_image": wrist_image,       # (224, 224, 3) uint8
    "observation/state": robot_state,             # (8,) float32
    "prompt": "pick up the red block",
})

actions = action_chunk["actions"]  # (10, 7) action trajectory
Troubleshooting
| Issue | Solution |
|---|---|
docker build fails pulling base image | Ensure network access to nvcr.io. Try docker login nvcr.io |
| TensorRT engine build OOM | Reduce MAX_BATCH to 1 in build_engine.sh |
ModuleNotFoundError: No module named 'openpi' | PYTHONPATH is not set. Run Step 5.1: export PYTHONPATH=packages/openpi-client/src:src:.:$PYTHONPATH |
| ONNX export fails | Ensure transformers patches were applied (Step 5.3) and PYTHONPATH is set (Step 5.1) |
NVFP4 TRT_FP4DynamicQuantize blocked axis error | The Gemma attention reshape must use an explicit dimension (not -1). The shipped transformers_replace already includes this fix — make sure you completed the copy in Step 5.3. |
| Checkpoint download fails | Check internet connectivity; GCS URLs require no auth for public checkpoints |
| Low cosine similarity (< 0.99) in compare mode | First re-run a few times — compare uses random noise per run and a single unlucky draw can dip low (average several runs or pin --golden-noise-path). If it is consistently low, try FP8-only (drop --enable_llm_nvfp4) to isolate NVFP4, then re-export and rebuild. |
| HuggingFace dataset download needs token | Set export HF_TOKEN=<your_token> if using --use-dataset flag |
Acknowledgments
These TensorRT optimizations were inspired in part by the FlashRT community project, whose published Jetson Thor inference results helped motivate this work.