Build a Video AI Pipeline Using VSS with D1 and Cosmos
Use NVIDIA Video Search and Summarization, D1-2B, and Cosmos to find traffic queues and review selected clips on Jetson AGX Thor.
 Hassan Moustafa
NVIDIA Video Search and Summarization (VSS) is an open-source blueprint for building video AI applications. The source code is available in the VSS GitHub repository. VSS can ingest live or recorded video, search it with natural-language queries, and summarize the events it finds.
VSS also provides a Real-Time Alerts workflow. On Jetson AGX Thor, start the VSS Alerts developer profile and describe what you want to detect in plain language, such as stopped vehicles or a dropped box. The real-time VLM checks the RTSP stream and creates an alert when it finds a match. You can review the alert in the VSS UI, ask the agent about it, or generate a report.
Example: Traffic camera analysis
A traffic camera can record for hours while the evidence you need lasts seconds. In this tutorial, you’ll build a pipeline on Jetson AGX Thor that looks for queued traffic and asks Cosmos to review the clips that meet a trigger.
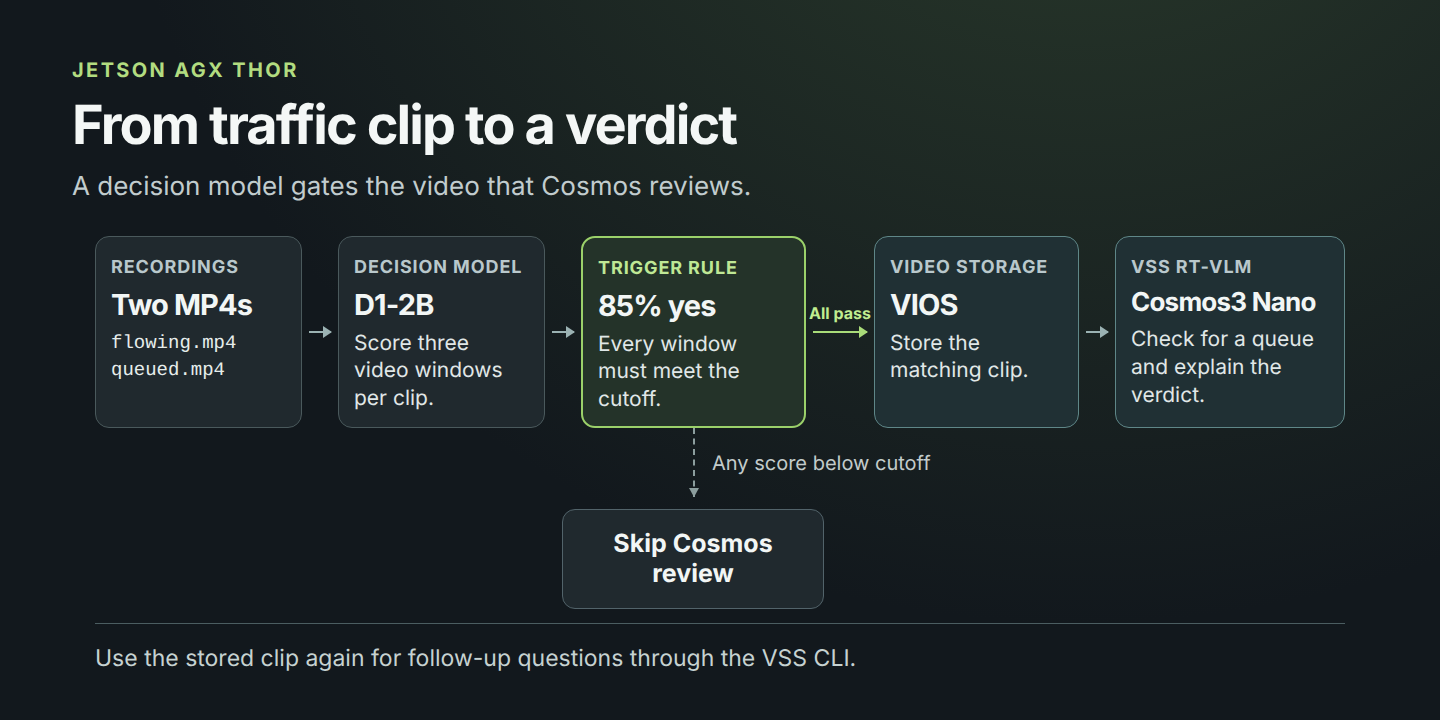
This tutorial builds a custom two-stage pipeline rather than using the stock VSS Alerts profile. D1 first decides whether a clip meets the traffic condition, then VSS sends qualifying clips to Cosmos for review.
Overview
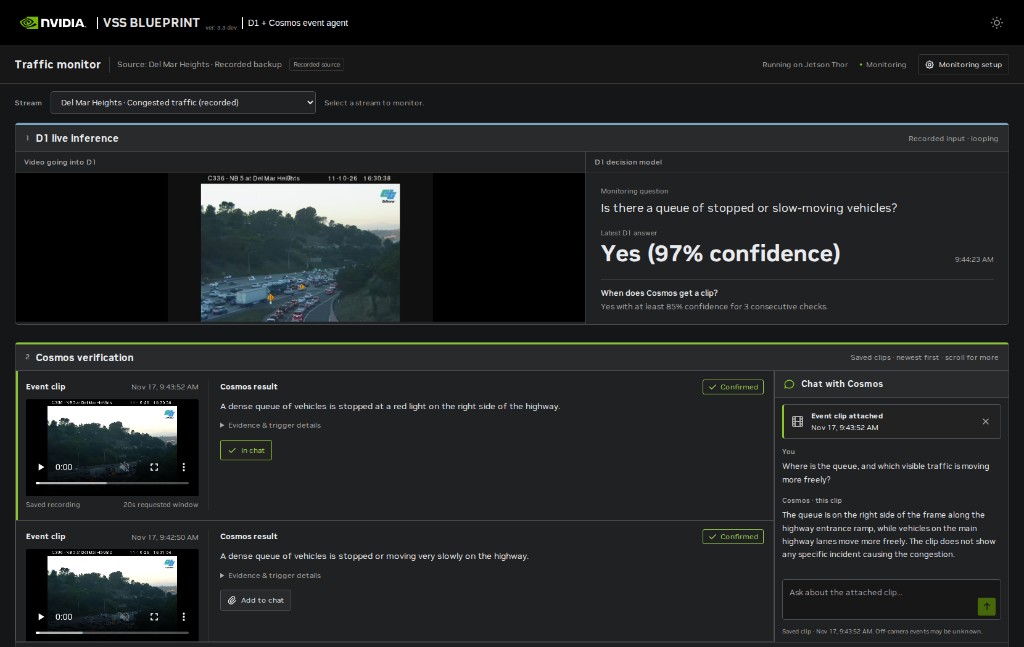
D1-2B answers a yes/no question for each window of video. A short Python script applies the trigger. Only a recording that meets the cutoff on all three checks reaches Cosmos3 Nano Reasoner through VSS RT-VLM. Cosmos returns a verdict and explains the visible evidence.
VSS Video I/O and Storage (VIOS) keeps the selected clip so you can ask follow-up questions about the same evidence. The walkthrough runs D1 and Cosmos in sequence on the same Thor, using the public VSS 3.3.0 release and the VSS CLI.
Run the streaming example
To run D1 and Cosmos on a continuous video stream, clone the decision-model alerts example. It adds a stream selector, rolling D1 scores, and a Cosmos review panel to the VSS UI.
git clone --single-branch --branch examples/decision-model-alerts \
  https://github.com/hmoustafanvidia/video-search-and-summarization.git vss-decision-alerts
cd vss-decision-alerts
Follow the example setup instructions to configure your video inputs and start the Docker Compose services on Thor.
To build the two-stage pipeline yourself with two local recordings, follow the steps below in a fresh shell.
Prerequisites
- Jetson AGX Thor with JetPack 7.2 and Jetson Linux 39.2.
- Docker Compose and NVIDIA Container Toolkit, set up according to the VSS prerequisites. Use a Thor with no competing VSS deployment because the stock services use fixed names and ports.
- Git, Git LFS, Python 3, and uv. Use Bash on Thor and keep the same shell open for the commands below.
- An NGC API key with access to the VSS and NVIDIA PyTorch containers and the Cosmos weights. Follow NGC credential setup and export
NGC_CLI_API_KEYbefore you start. - Two H.264 MP4 clips around 20 seconds long. Pick one with flowing traffic and one with a sustained queue. Make sure the first 12 seconds show the condition you want to test.
Validation. Compose configuration and frame extraction were checked, and the trigger gate was tested with mock model responses. A clean end-to-end GPU run on Thor is still pending.
Getting Started
Step 1. Set up the workspace
Clone the release, install the matching VSS CLI, and log Docker in to NGC.
mkdir -p "$HOME/vss-traffic-walkthrough"
cd "$HOME/vss-traffic-walkthrough"
export TRAFFIC_DIR="$PWD"
git clone --depth 1 --branch v3.3.0 \
  https://github.com/NVIDIA-AI-Blueprints/video-search-and-summarization.git vss
(cd vss && uv tool install --python 3.13 ./libs/vss/cli)
vss --version
printf '%s' "$NGC_CLI_API_KEY" | \
  docker login nvcr.io --username '$oauthtoken' --password-stdin
Expected result: vss --version prints the installed CLI version and Docker reports Login Succeeded.
Copy your recordings into $TRAFFIC_DIR as flowing.mp4 and queued.mp4.
Step 2. Score both recordings with D1
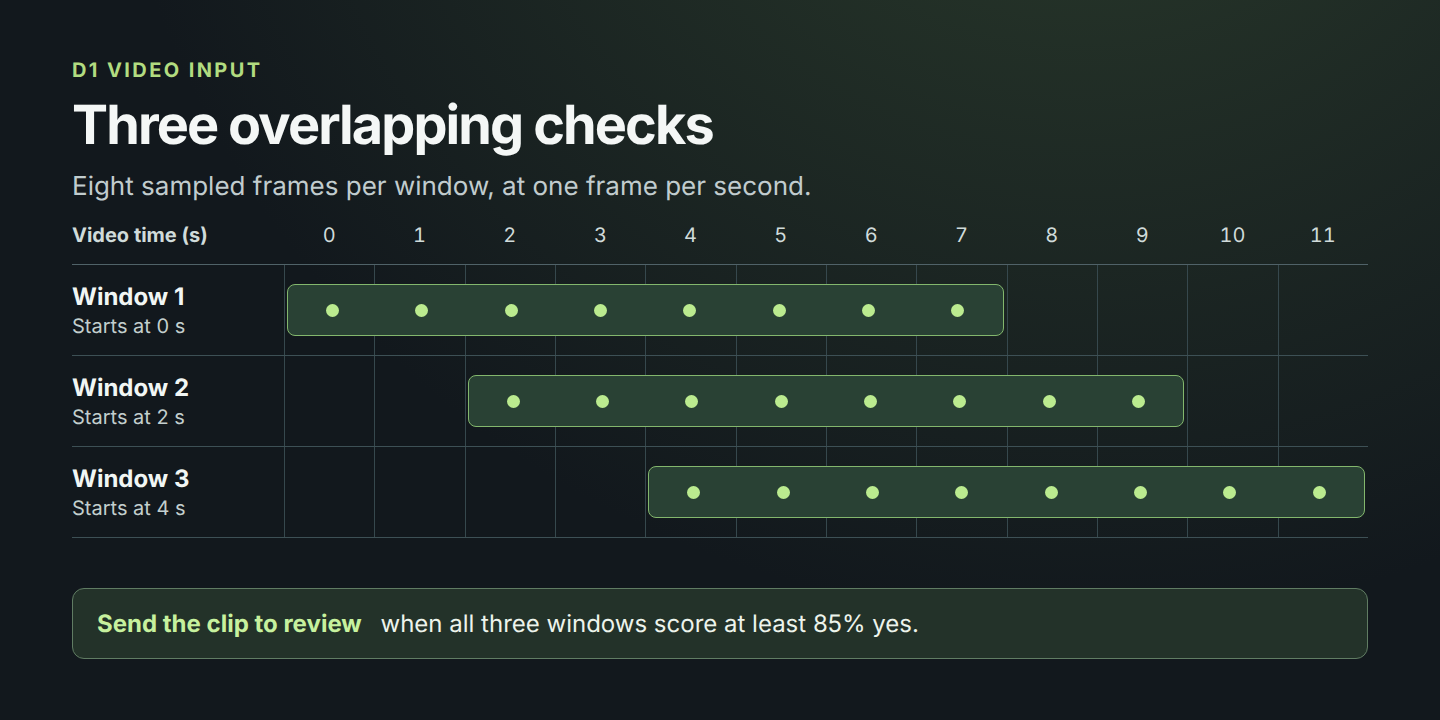
Extract eight frames at one frame per second from each window. Start the windows at 0, 2, and 4 seconds. The first and last sampled frames in each window are seven seconds apart.
ffmpeg_bin="$(uv run --no-project --with imageio-ffmpeg==0.8.1 \
  python -c 'from imageio_ffmpeg import get_ffmpeg_exe; print(get_ffmpeg_exe())')"
frames_dir="$(mktemp -d "$TRAFFIC_DIR/frames.XXXXXX")"
for clip in flowing queued; do
  for offset in 0 2 4; do
    out="$frames_dir/$clip/$offset"
    mkdir -p "$out"
    "$ffmpeg_bin" -v error -ss "$offset" -i "$clip.mp4" -map 0:v:0 \
      -vf 'fps=1,scale=640:-2' -frames:v 8 "$out/%02d.jpg"
  done
done
Save this as score.py in $TRAFFIC_DIR. It loads the pinned D1-2B checkpoint once, prints the three scores for each clip, and writes the qualifying filenames to candidates.txt.
from pathlib import Path
import os

import torch
from PIL import Image
from transformers import AutoModel

model = AutoModel.from_pretrained(
    "LiquidAI/d1-2B",
    revision="652f920e544ea37f81e4b0ce89b81d4ed0da90b1",
    trust_remote_code=True,
    dtype=torch.bfloat16,
).to("cuda").eval()

questions = {
    "queue": {
        "type": "noul",
        "instructions": "Is there a queue of stopped or slow-moving vehicles?",
    }
}

frames_dir = Path(os.environ["FRAMES_DIR"])
candidates = []
for clip in ("flowing", "queued"):
    scores = []
    for offset in (0, 2, 4):
        files = sorted((frames_dir / clip / str(offset)).glob("*.jpg"))
        if len(files) != 8:
            raise SystemExit(f"{clip} at {offset}s needs eight frames")
        frames = []
        for path in files:
            with Image.open(path) as image:
                frames.append(image.convert("RGB"))
        media = [{"type": "video", "video": frames, "fps": 1.0}]
        with torch.inference_mode():
            result = model.system_one(None, questions, media=media)
        score = float(result["answers"]["queue"]["noul"])
        scores.append(score)
        print(f"{clip} at {offset}s: {score:.1%} yes")
    if all(score >= 0.85 for score in scores):
        candidates.append(f"{clip}.mp4")

Path("candidates.txt").write_text(
    "".join(f"{name}\n" for name in candidates), encoding="utf-8"
)
Run the script in the NVIDIA PyTorch container. The first run downloads the model. Treat 85% as a starting threshold and compare the scores against your two recordings before continuing.
mkdir -p "$TRAFFIC_DIR/hf-cache"
docker run --rm --runtime=nvidia --ipc=host \
  --user "$(id -u):$(id -g)" -e HOME=/tmp -e HF_HOME=/work/hf-cache \
  -e FRAMES_DIR="/work/${frames_dir##*/}" \
  -v "$TRAFFIC_DIR:/work" -w /work nvcr.io/nvidia/pytorch:26.09-py3 \
  bash -ec 'python -m pip install --user transformers==5.19.0 \
    Pillow==12.3.0 huggingface-hub==1.31.0 && python score.py'
Expected result: the script prints three D1 confidence scores for each recording and writes every clip that passes all three checks to candidates.txt. The exact scores depend on your footage.
Step 3. Start VIOS and Cosmos
Once the D1 container exits, start the VIOS and RT-VLM services. The Compose overlay binds the published ports to loopback.
cd "$TRAFFIC_DIR/vss/deploy/docker"
export VSS_APPS_DIR="$PWD" VSS_DATA_DIR="$TRAFFIC_DIR/data"
export VSS_CONTAINER_TAG=3.3.0 HARDWARE_PROFILE=AGX-THOR
export COMPOSE_PROJECT_NAME=vss-traffic-walkthrough HOST_IP=127.0.0.1
export COMPOSE_PROFILES=centralizedb,redis,vst-ingress,sensor-ms,streamprocessing-ms,vios-apt-cache-init,rtvi-vlm,vss-haproxy-ingress
export RTVI_VLLM_GPU_MEMORY_UTILIZATION=0.35 RTVI_VLM_MAX_MODEL_LEN=8192
export VST_CONFIG_PATH="$VSS_DATA_DIR/vios-configs"
export VST_NOTIFICATION_CONFIG_PATH="$VST_CONFIG_PATH/notification_config.json"
mkdir -p "$VSS_DATA_DIR"
if [ ! -d "$VST_CONFIG_PATH" ]; then
  cp -a services/vios/configs "$VST_CONFIG_PATH"
fi
for dir in redis/data redis/log vst/vst_data/logs/nginx_logs \
    vst/vst_video vst/temp_files; do
  install -d -m 0777 "$VSS_DATA_DIR/data_log/$dir"
done
sudo install -d -o 1001 -g 1001 -m 0770 "$VSS_DATA_DIR/data_log/vst/clip_storage"
cat > "$TRAFFIC_DIR/loopback.compose.yml" <<'YAML'
networks:
  default:
    driver_opts:
      com.docker.network.bridge.host_binding_ipv4: "127.0.0.1"
YAML
traffic_vss() {
  local base=developer-profiles/dev-profile-base
  docker compose -f compose.yml -f "$TRAFFIC_DIR/loopback.compose.yml" \
    --env-file containers.env --env-file "$base/.env" \
    --env-file "$base/overrides.env" "$@"
}
traffic_vss config --services
traffic_vss up -d
traffic_vss ps
Wait for RT-VLM to finish downloading the model and reach a healthy status. Configure the VSS CLI against the local ingress.
vss configure --base-url http://127.0.0.1:7777
vss configure check
Expected result: traffic_vss ps shows the VSS services running, and vss configure check confirms that the local VSS endpoint is reachable. Model downloads can make the first startup take several minutes.
Review the Results
Step 4. Verify the selected clips
Upload the clips in candidates.txt to VIOS. The upload waits for indexing and returns the clip’s name. Pass that name to RT-VLM to ask Cosmos whether the clip shows a queue.
cd "$TRAFFIC_DIR"
(
  set -eu
  while IFS= read -r clip; do
    stored="$(vss vios add --type video "$clip")"
    sensor="$(python3 -c 'import json,sys; print(json.load(sys.stdin)["name"])' <<< "$stored")"
    vss vlm run --sensor "$sensor" --no-persist --timeout 180 \
      --max-frames 8 --chunk-duration 0 --disable-reasoning --max-tokens 256 \
      --prompt 'Is there a stopped or slow-moving queue? Give one verdict: confirmed, rejected, or uncertain. Explain what is visible in the clip. Avoid estimating speeds or guessing the cause.'
  done < candidates.txt
)
Expected result: Cosmos returns one verdict for each selected clip, followed by an explanation based on visible evidence. If candidates.txt is empty, this command does not submit any clips.
Compare the verdict with the footage. When neither recording meets the trigger, the empty candidate list produces no reviews.
Step 5. Ask a follow-up question
Run vss vios list --type video and copy the stored clip name from the output. Use it to ask which lanes are moving.
read -rp 'Stored clip name from VIOS: ' sensor
vss vlm run --sensor "$sensor" --no-persist --timeout 180 \
  --max-frames 8 --chunk-duration 0 --disable-reasoning --max-tokens 256 \
  --prompt 'Which lanes appear to be moving, and what is unclear in this clip?'
When you finish, stop the services while keeping the recordings and model caches.
cd "$VSS_APPS_DIR"
traffic_vss stop
Troubleshooting
- Frame extraction produces fewer than eight frames. Check that the source is a readable H.264 MP4 with enough footage to sample all three windows.
- D1 scores look similar for both inputs. Compare the first 12 seconds side by side and try a pair of recordings that clearly show flowing and queued traffic from a similar angle.
- RT-VLM stays unhealthy. From
$VSS_APPS_DIR, runtraffic_vss logs --tail 80 rtvi-vlmto check model downloads and startup.
Next Steps
Use VSS Agent Skills if you want a coding agent to help extend the pipeline. Install the Build Vision AI skill from the same VSS checkout. For an agent that uses ~/.agents/skills, link it into that directory.
mkdir -p "$HOME/.agents/skills"
ln -s "$TRAFFIC_DIR/vss/skills/vss-build-vision-ai" \
  "$HOME/.agents/skills/vss-build-vision-ai"
Open your coding agent from the VSS checkout and ask it to use Build Vision AI to add an RTSP input, score rolling windows, and retrieve a clip from VIOS when the rule fires. Then add a VSS UI panel for live scores, saved clips, and Cosmos verdicts. Test each stage with both the flowing and queued recordings before switching to a live source.